Daily tasks:
- Prepare topper for new autumn collection
- A/B test: launch topper for different segments
- Launch one time email for 4th article

Prepare topper for new autumn collection
Today, I focused on preparing a web form topper to announce our exciting New Autumn Collection on our website. Here's how I went about it:
- I went to web forms section to New collection folder.
- I duplicated the topper, renamed it to "Autumn collection" and started editing it
- I decided to choose the same orange color I used for end-month sale for background. Added text "Step into the vibrant world of fall with our latest Autumn Collection!" and a button that leads to autumn collection page.

With this eye-catching web form topper, we are well-prepared to captivate our website visitors and generate excitement about our New Autumn Collection. I'm excited to see the response and engagement from our audience as they discover our latest seasonal offerings.

A/B test: launch topper for different segments
At the end of last month, I mentioned my intention to test the effectiveness of our topper by launching it on different segments of our audience. Despite it not being a sale, I decided to proceed with the experiment. Here's what I did:
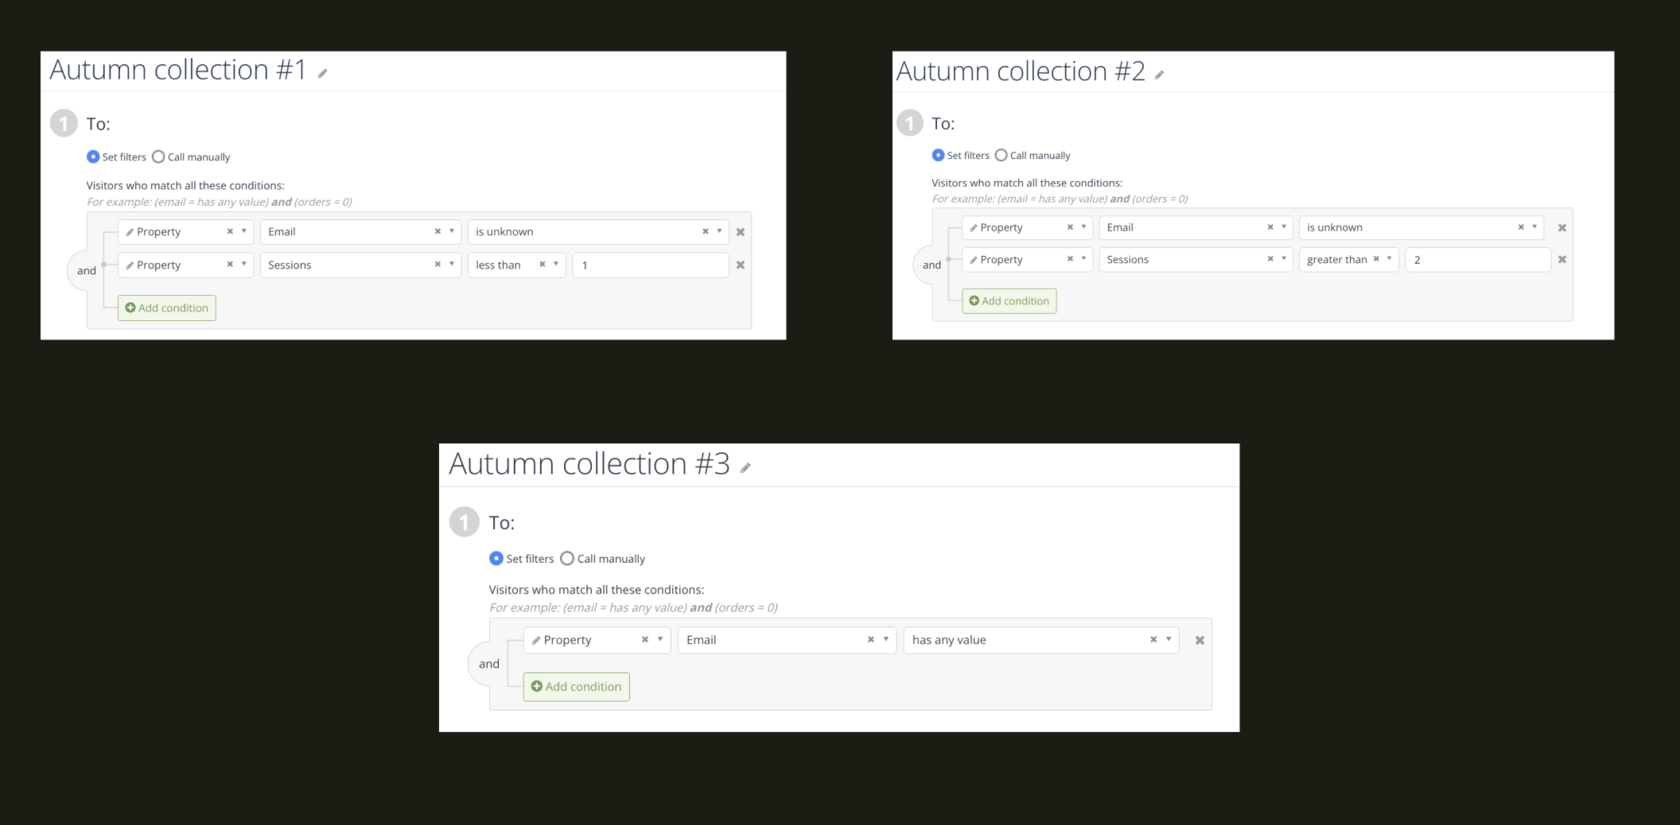
- I duplicated this topper for 3 times.
- For the first variation, I set the display conditions as follows: if the email characteristic is unknown and the number of visits is less than one.
- In the second variation, I adjusted the conditions to target those whose email is unknown and have visited our website two or more times.
- Lastly, for the third variation, I focused on those whose email is known.
- Once all three variations were set up, I launched them simultaneously, ensuring that their display would not overlap in any way.

By segmenting our audience and tailoring the topper display based on their characteristics, I aim to gauge its effectiveness in capturing the attention of different user segments. This data will provide valuable insights to guide our future marketing strategies and optimize our engagement efforts.

Launch one time email for 4th article
The process of creating the blog email was similar to last week's:
Next week, I'll evaluate the overall results for the month and decide whether to continue with the weekly blog newsletters or explore other options.
- I duplicated the previous email and edited the content, including the picture and article description.
- I added the products mentioned in the article to the email.
- For the recipient segment, I chose the same criteria as last week - those who have an email and visited the site within the last 2 weeks.
- To ensure everything looked good, I sent a test email to myself, and once satisfied, I hit the send button.
Next week, I'll evaluate the overall results for the month and decide whether to continue with the weekly blog newsletters or explore other options.
